Adding a Serverless Commenting System with AWS
Table of Contents
1. Introduction
In this post I explain how I implemented a serverless commenting system with AWS. Requirements:
- A way to give a post a unique identifier so that it could pull its own comments
- Database of comments
- An API to GET and POST comments
- HTML form
- A display for previously submitted comments, newest first
The first problem I faced was giving each post it's own number. I decided to keep it simple and embed a script in the source of each post:
<script type="text/javascript">
const postNum = 6;
</script>
2. DynamoDB
Next I had to find a way to store the data. In general I use SQL databases, but for this task it seemed overkill as I don't have any other relational data for this site. I decided to use AWS DynamoDB.
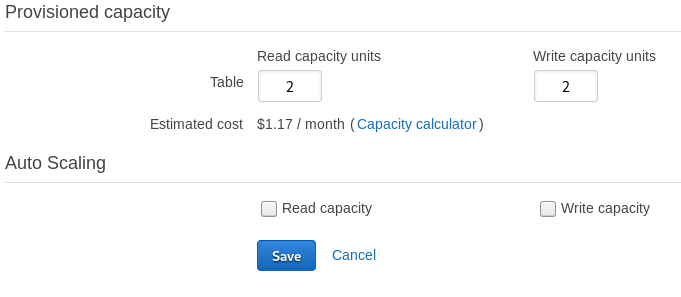
DynamoDB is a NoSQL database that can scale to any level. You can either choose to pay for the amount read/writes that you want to allow per second, or you can let it auto scale, up to a claimed 20 million requests per second. I went with the former, which is called provisioned capacity.

I set my table is to handle 2 requests per second for now. This can be edited at anytime, which allows you to start small and increase it as you see fit.
One of things that I struggled with when setting up my comments table is the "NoSQL" bit. I didn't quite grasp that it means exactly what it says: DynamoDB is not SQL. A SQL table has a set amount of columns and robust language to make fast queries on any column.
In contrast, a DynamoDB table has a primary key which uniquely identifies any kind of JSON object that is stored in the table. The benefit is that it allows for any structure of data to be stored in it. The downside is that it makes efficient SQL like queries for non primary key attributes impossible.
If I were doing SQL, I would make a table like this:
id |
post_number |
comment_name |
comment_body |
time_stamp |
|---|---|---|---|---|
| 1 | 6 | nicolas | cool post | 1/14/19 |
| 2 | 6 | nicolas | sql is better than nosql | 1/14/19 |
And query for it like this:
SELECT time_stamp,
       comment_name,
       comment_body
FROM comments
WHERE post_number = 6 ORDER BY time_stamp;
The problem with making this table in DynamoDB is that posts must be
pulled by their post number, and then ordered by their timestamp. I
wouldn't be able to query by the post number because id is the
unique primary key.
If I wanted to use this schema, I would have to use the following algorithm:
- Pull every comment in the table
- Make a list of all the comments of the post
- Sort this list by its date.
I needed a primary key that would always be unique, which I could also use to get all the comments for a specific post.
I pulled up the DynamoDB docs, and learned about composite primary
key's. A composite primary key is combination of a partition key
and sort key. Multiple items may share the same partition key, but
their sort keys must be unique. A list of rows can be pulled by their
partition key, and they will come out ordered by their sort key.
I dropped the id key. I replaced it with composite key:
post_number being the partition, and time_stamp being the sort
key.

Note that the comment_body and comment_name columns are not
specified. I can submit data with any key to this table
and a new column will be created for it. The only requirements are
that post_number exists and that time_stamp is unique.
3. API
With the comment table setup, the next task was to create some
Lambda functions to perform read/write operations. I used Golang to
accomplish this.

Here are the Lambda handlers: get comments and post comment. I hooked these up with API Gateway as proxy integrations.
I wrote some JavaScript to handle generating the form, retrieving comments, and posting comments: comments.js
Then I updated my static site generator to embed the following in every post:
<noscript>
  <div id=\"no-script-comment-message\">Enable scripts to see and post comments.</div>
</noscript>
<script type="text/javascript" src="js/comments.js"></script>
I hit the submit button and a yellow message popped up in my console:
"Cross-Origin Request Blocked". I discovered that my browser was
protecting me from fetching resources from a different server than the
page was hosted on.
On a classic web server this isn't a problem because the backend files are in the same domain as the html. At this point I hit the biggest roadblock that I faced in the project - figuring out how to get around this.
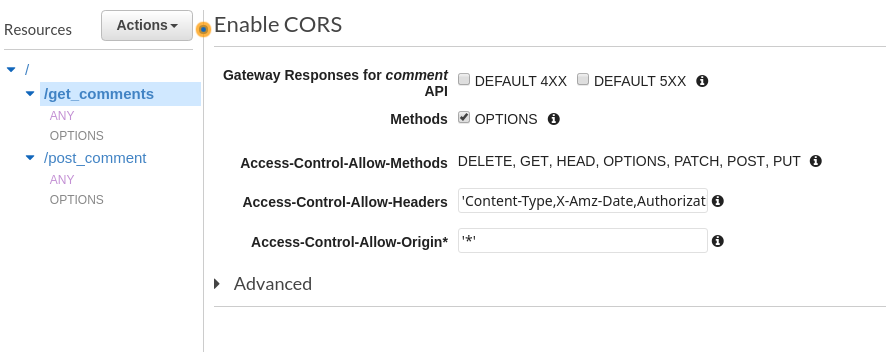
I learned that cross origin requests can be allowed through CORS, or Cross Origin Resource Sharing. This can be enabled on the server that the resources are being requested from. I added the following to my lambda handlers:
response.Headers = map[string]string{"Access-Control-Allow-Origin": "*"}
This means "allow any website to request this resource". I could
change the * to nicolasknoebber.com, but I test this often from
localhost, so I chose to leave it as the wild card.
I went back to the AWS docs, and eventually found this article. In
addition to the Access-Control-Allow-Origin header, I would need to
create another method in API Gateway, a so called "Preflight"
check. Luckily, API Gateway automates this process.

So when a script in one of my blog posts makes an API call to AWS, it will first send an OPTIONS request, which API Gateway will respond back and say OK, this CORS request can go through. After receiving this reply, the actual POST request will be sent out that saves the comment.
4. Finishing Up
After I got around the CORs roadblock the rest of the project came together quickly. I added a bit of CSS to make the comments float in and thought about some anti spam measures. I decided not to worry about spam too much because I get such low traffic. Most importantly I have auto scaling off so my bill wouldn't spike if I were targeted for some reason.
I'm happy with the result. It's easy to maintain and cheap: with my stack of CloudFront + S3 + DynamoDB + Lambda + API Gateway + Route53 I pay around $1 a month.
