Moving My Website to Amazon S3
For the last year I've had this website hosted on an Amazon EC2 instance, which has cost about $10 a month. That's not too expensive, but with S3 the cost can be almost nothing, depending on how much traffic I get.
S3 - Amazon's simple storage service - is a like a more powerful Google Drive. It lets you create "buckets", which are unique storage devices kept in the cloud. S3 come with a powerful API so that uploads and downloads can be automated through scripting, and most importantly, options that allow their contents to be shared with the world wide web.
The first step to hosting on S3 is to create a new bucket. The name must be unique across all of AWS. This should match up with the websites domain name, in my case, nicolasknoebber.com .
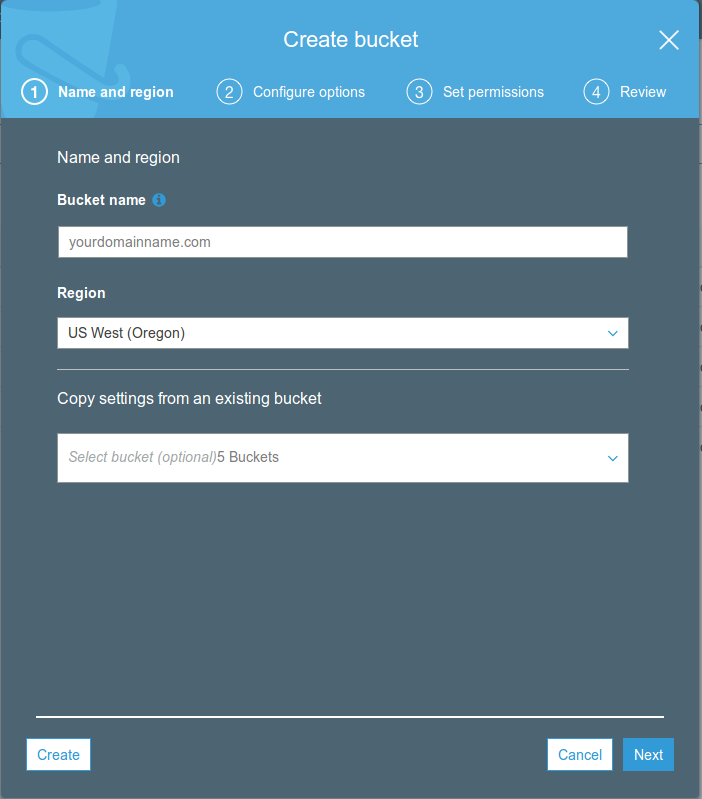
I left all the settings as their defaults. After its created, the
websites files can be uploaded into it. This can be done manually with
their web GUI, or through their API. I personally prefer the latter,
and I recommend the command line tool awscli for managing the calls.
awscli can be installed through most system package managers or
pip. Before using it, an access key must be obtained from the IAM
section of AWS. With an access key handy run aws configure and
follow the instructions. Once its setup, the vast power of Amazon Web
Services is ready to be wrangled from the comfort of a terminal. The
possibilities are endless!
The tool is invoked with aws followed by the service that is being
used, and then a function for that service. In my case, I want to call
s3 with a function called sync. When in doubt, aws s3 sync help is
very useful. I'll create a bash script to upload everything I have
locally to my bucket, which will make deploying changes to my site
easy. I want the script to upload html, css, and image files to the
bucket from my local project folder. The problem is that this project
has lots of other files like markdown, git, lambda functions, and
various other scripts. My first thought was to use many --exclude
tags to achieve this. But it was difficult to blacklist all the
different types of files reliably, and it had no future proofing in
the case that I added some other type of file to this repo. Instead
of blacklisting, it is possible to white list by excluding everything,
and then including only certain types.
#!/usr/bin/bash
 aws s3 sync $HOME/projects/nicolasknoebber.com s3://nicolasknoebber.com \
--exclude "*" \
--include "*.html" \
--include "*.png" \
--include "*.jpg" \
--include "*.css" \
$1
Note the $1 at the end - this allows me to pass another optional
flag to aws s3 sync. A useful one that I use often is --dryrun,
which lets me see everything that would be uploaded without actually
doing it. Finally I'll add the directory of this script to my path so
that I can call this in any directory and have my local files uploaded
to my bucket.
~/.bashprofile
export PATH=$PATH:/$HOME/projects/nicolasknoebber.com/scripts
Now for the important part: making these uploaded html files public on the web. This is surprisingly simple. In a web browser, navigate to the bucket in the AWS web app. Click the properties tab and then "Static website hosting". Enter the name of the index document, and then save it.
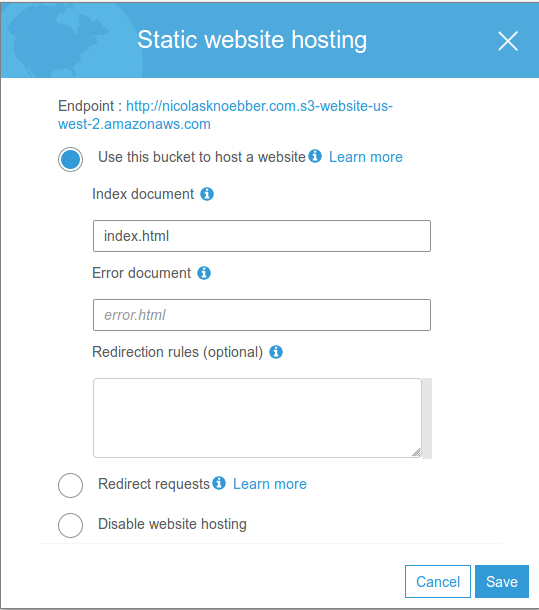
The bucket is now hosted on the web, and can be viewed by clicking on the link.
However, this isn't public. To make it so that anyone can read it, head over to the permissions tab and then bucket policy. I added this to the text area, which allows anyone to view the bucket:
{
    "Version": "2012-10-17",
    "Statement": [
	{
	    "Sid": "PublicReadGetObject",
	    "Effect": "Allow",
	    "Principal": "*",
	    "Action": "s3:GetObject",
	    "Resource": "arn:aws:s3:::nicolasknoebber.com/*"
	}
    ]
}
I'm not done yet though. I could tell all my friends to visit http://nicolasknoebber.com.s3-website-us-west-2.amazonaws.com/ but I would rather have it just be nicolasknoebber.com. This is a job for DNS, or Domain Name System. This allows for websites to be given shorter names instead of having everyone remember long unwieldy addresses. Before setting up DNS, I'll have to create another bucket for www.nicolasknoebber.com. This bucket is identical to the first, but under the static web hosting menu I'll check 'Redirect all requests', and then point it to the original bucket name.
There are many DNS services, but to keep with the Amazon theme, I'll use Amazon Route 53 From here navigate into hosted zones. I'll create a new hosted zone with the same name as my bucket, nicolasknoebber.com
This generate a NS (name server) type row. Now Route53 needs to be
told to point the traffic towards S3. I'll create a record set named
www. For the alias target I put
s3-website-us-west-2.amazonaws.com.
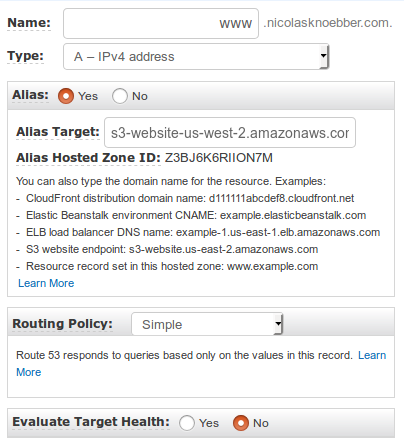
I still need another record set. I'll make it the same as before but with the name field empty. This makes it so that 'www' won't need to be entered before the url when navigating to this website.
The final step is to configure my domain name. Though AWS has a service for this as well, I have mine registered on Google Domains. So at least one part of my stack isn't be Amazon! Previously my domain name was pointing to an Amazon EC2 instance. Now I'll have to change it to use the custom name servers that I setup in Route53. Google makes this easy though with their "Use custom name servers" option.

And that's it! Or so I thought. Turns out DNS settings take a while to
come into affect. I had to wait about 10 hours before I could hit my
website from nicolasknoebber.com.